As a new fashion brand or even an existing one, you’ll need to get things made at some point. If you’re making your own products, then the garments or products you make have to still live up to your country’s legal standards and if you’re asking someone else to make them, like a factory, then again you need to abide by the law.
Quite apart from the law, QC [Quality Control], or sometimes called QA [Quality Assurance] should always be done, just to make sure that you are delivering the best products to your customers if you want to stay in business and encourage customers to return, spending money with you.
QC or QA is basically checking and testing your garments, accessories and products to make sure that the product is what you designed, the materials are reliable and fit for purpose [click here to find out what that means] and every part of your product lives up to the legal requirements and your personal standards when they are made.
Before I get into the things you should be looking for, I should clarify a few things. Firstly QC and QA are often used to mean the same thing. Actually they aren’t, so here is the short version of each:
The QA process deals with all aspects of quality levels. You ensure that everything, not just garment or product checking, are passing all standards both personally set by you and legally, but also quality and management systems in all areas are in place and both parties have guidelines to work towards and are understood. QA also includes the QC process also.
The QC process applies to the control of standards in only 2 areas, products and service location. Basically, are the products tested and up to a good enough standard to sell and is the place you are making your products passing all quality standards.
There are also a few different parts to QC and a number of processes that happen depending on the stage you are at. It includes fabric and garment testing at an independent testing facility, which covers most of the legal requirements you need to produce garments and accessories. There is also factory testing or inspections. For now, I’m going to concentrate on the basics that will happen during your sampling.
For most people, this is a basic form of QC and only covers the quality of what you asked someone to make. As far as I know, it doesn’t have a particular name but I’ve heard it referred to as a number of things like “Comment QC”, “in process QC”, “sample QC”, and “product specification QC”, but it is accepted as a part of the development process of each product. It happens after you receive each sample, from whoever is making them, throughout the sampling process. You measure, check and make notes for improvement. The next sample is made with these comments and sent back to you and so on until you are happy with the product. If you’re not sure what you should be looking for when you are QCing your samples, here is a list of things you’ll need to do.

DETAILS ON THE TECH PACK
If this is not your first sample, then do make sure you are comparing with the updated technical pack, including the comments you made last time round plus any other comments you have made previously.
I should point out at this stage, that if you are in the 1st or even 2nd sample stage, sometimes to help with speed, factories do use substitute fabrics and yarns in available colours, finishes or prints while waiting for the one you asked for. They should be however, use the same type of fabric weight and finish so that you can see the overall shape of the finished product and they should tell you if they are going to send something different before it is sent. Usually the colour will be the only change and the sample will arrive in something standard like a black or white.
Every sample should come with some kind of label attached that includes a sample date and style number and should arrive folded in some kind of protective packaging, usually a plastic garment bag.
SIZE
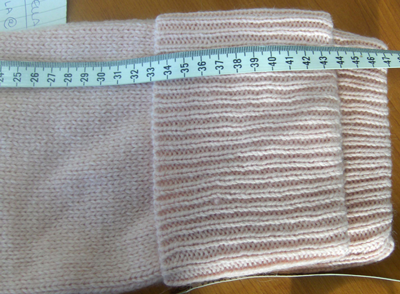
- Is the garment or product the correct size that you asked for in your tech pack? Remember to measure every measurement point that you noted in your technical pack and make sure you are measuring between the two points specified in the technical pack. Quite often the factory will measure and note down the results on the sheet that is sent with the sample, but still check. They can often be wrong.
DETAILS
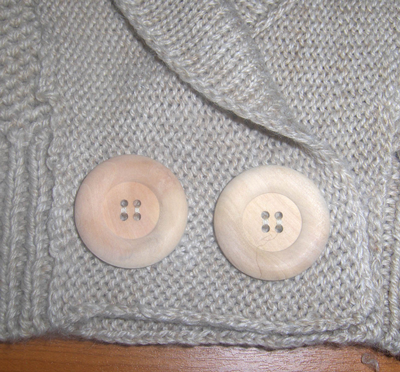
- Buttons, zips and trims are all the correct shape, colour and size.
- Any specialist finishes to the garment or to trims are correct. For example, water-resistant plastic finishes rather than metal ones.
- Fabric is the correct colour, composition and weight.
- Any stripes or prints that you have asked for match at the side seams as requested.
- If you asked for a particular fabric direction, that this is followed. For example, bias cut fabric or rib direction.
- Thread is the correct colour and stitching is the correct type of stitch in all places.
- Embroideries, logos and appliques are in the correct place and are the correct colours and size.
DETAILS OFF THE TECH PACK
There are a number of things that should be done correctly, even if you have not specified them in the technical pack itself. If you have specified shapes or sizes of the garment or any of its details in your design, then these will be followed. If not, then garments should be made with a clean symmetrical finish where appropriate.
FINISH
- Check that all lines are even and finished correctly, like the hem and cuffs.
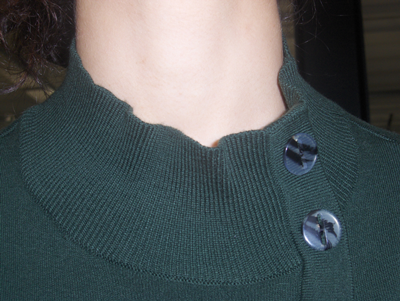
- Any openings, where two pieces of fabric meet, are even and neat, especially at hems. If you have anything with an overlapping finish, like the button placket of a shirt, that the front panel hides the back one neatly and that the two pieces line up and match evenly.
- Collars and cuffs are constructed correctly with any reinforcement or interlining where needed. The wings of each side of the collar are even and equal. If the collar is a rib fabric, that the rib is flat and smooth.
- Collars, cuffs, pockets and details are securely attached to the garment.
- Garments are correctly pressed, especially at seams. Make sure there is no over pressing, which will leave a glossy finish on most fabrics and yarns.
CLOSURES
- Make sure that any buttons and button holes work properly and that the buttonholes are the correct size for the button.
- Zips work easily and can be opened or closed without any problems.
- Press studs or poppers are securely fastened at each side and are neatly stitched. They can be opened easily and are secure when closed.
STITCHING
- Stitching is uniform and even throughout without skipped stitches
- That the tension is correct on seams and not pulling or gathering fabric where it shouldn’t.
- That the type of thread and stitch is correct for the fabric. For example, that stitching is a chain stitch or thread contains some elastic to allow for stretching the seams on jersey materials.
- Buttonhole stitching is neat and secure on both the front and back. They lie flat and do not pucker or have loose stitching.
- All loose thread ends are trimmed and finished correctly
SEAMS
- Seams are secure and not coming apart when tugged. Check especially the places that will have the most wear, like necklines, cuffs and button stands.
- Raw edges are overlocked to finish them.
- That all seams are flat and even. There is no pulling, puckering

PRE-PRODUCTION OR PRODUCTION SAMPLES
As well as all the things listed above, some additional things need to be checked when getting towards the production stage. The pre-production stage is your prototype and should be completely finished and ready for inspection. This is the sample that you will approve and allow the factory to move onto the bulk production.
- The proper packaging should be included at production, whether that is full packaging for a finished product or simply shipping packaging to protect the garment during transport.
- Any hangers or additional packaging should also arrive for approval to make sure that the garment factory has the correct additional items if they are responsible for the finishing process.
- Any garment labelling, swing tags, back neck labels, care labels, back neck tape or printing should now be included and finished to all artwork specifications as you requested.
- Fabric should now be the correct colour, type, weight, print or finish. At this stage you will need to approve the quality of the fabric before the full production can continue.
- If you are doing anything specialised like knitwear, or finishes to the fabric, for example denim acid washes, dying or printing, this should all now be correct to your specifications in terms of effect, size, placement, colour, gauge and tension.
The last thing is to remember to take pictures of everything you are unhappy with and write down your notes. At every stage you have to agree to the sampling result, but it is also essential to keep in mind that terminology may be different to what you are used to or even know, so pictures will help to explain your points.
Thanks so much for reading and I hope you are finding helpful information to build your fashion brand. If you find this post useful, please use the sharing buttons below to spread the word!